Sequillos - An Asturian Cookie of Love

cookie.final.jpg

We love to travel, and try to do it as often as possible.  We love exploring the sights, sounds and flavors of places that are full of life.  We recently returned from a 12 day trek through the northern part of Spain. What a glorious part of the country. Mountainous and green.  Fresh air and beauty abound. The views are more spectacular than any lens can capture, but I did my best.  And in those 12 days, we saw, did and tasted a lot but there is still so much more to see, do and taste. We thoroughly enjoyed every inch of our tour through the north. However, the absolute, truly most special part of this trip was when we stayed with our dear friends, Marcos and Angelica in Marcos' hometown of Amieva, Asturias.  What an enormous treat.  An adventure like no other.   

Beauty which ever way you turn.

Beauty which ever way you turn.

This tiny town of 200 people is tucked away high in the mountains and provides picturesque views from every angle. I promise I will be writing more about our entire trip and the special time at their home and all the unbelievably delicious food we were treated to. Today I want to focus on a simple little cookie that grabbed my husband's heart.  And when something grabs hold of him that he enjoys, I do what I can to ensure he gets grabbed again.  Knowing how much he loved eating these tiny bite sized treats with his espresso, I asked Marisa, a local to the town and chef of the house, to fork over the recipe. As with everything she did, she did so with "alegria”.

Sofia looking on as Maria sifts the flour and Marisa mixes the dough.

Sofia looking on as Maria sifts the flour and Marisa mixes the dough.

These cookies couldn't be easier to make. Much less work than any of the more labor intensive cookies I bake for Christmas. So, here it is.  From Marisa in Amieva, Asturias to me in Hartsdale, NY to you, wherever you may be.

I snapped a few shots of the lovely María and Marisa making yet another batch since every time they made them, these not too sweet but really satisfying cookies disappeared.

(That's something I loved about the style of living there.  It was no big deal to just whip up another batch of anything.  No worries...we'll make more!)

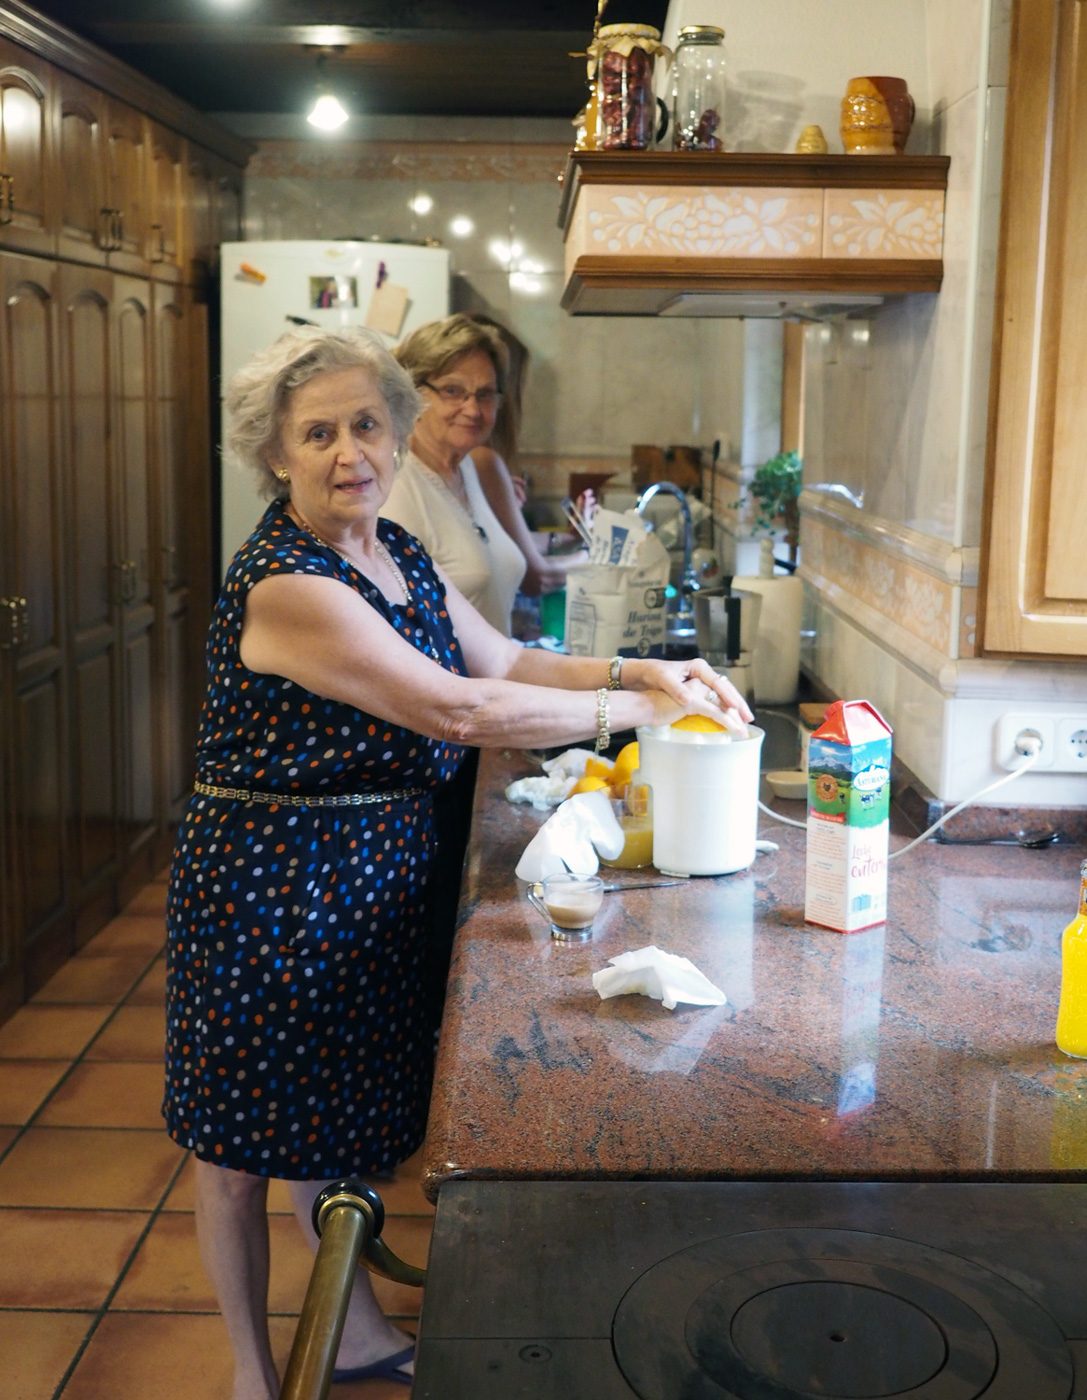
A tiny side note; another thing I loved about the original house -  the big kitchen. I loved how everyone was in it. Making stuff, prepping stuff, snacking, drinking and chatting.  Oh, if only I had a kitchen this big and ample to gather all my loved ones.  This tugged at my heart every time I stepped into it.

kitchen.table.jpg
Maxi and Sofia making fresh orange juice while the sequillos are being made further down this long kitchen work space

Maxi and Sofia making fresh orange juice while the sequillos are being made further down this long kitchen work space

A dream of a space where everyone could wander in, sit down or participate in the festivities.  I can dream, can't I?

Back to Marisa's setup and making of the cookies.

Marisa's set up in Amieva.

Marisa's set up in Amieva.

Sifting the flour.

Sifting the flour.

flour.sifting.jpg
 

And now the details of how to make them.

setup.jpg

ingredients

600 gr sifted flour
2 eggs
250 gr  sugar
250 gr butter, melted
1 tsp salt
1 tsp heaping baking powder
5 T Anís or Anisette
(I used Vermouth because it was all I had.)


Instructions

In a large mixing bowl, add all the dry ingredients and make a hole in the middle. Then add eggs, (cooled) melted butter and Anís in the middle.  Begin to combine all ingredients together until it forms a dough. Taking small pieces, form a round shape (approximately 1.5" w x 1/2" thick) and place in tiny cupcake papers to make them the traditional way.  

My dough

My dough

Marisa's cute little cookies in cupcake holders.

Marisa's cute little cookies in cupcake holders.

Since I like finding ways that are not only efficient, time saving but help make each one look consistent, I rolled the dough out and used a cookie cutter.  However, I should have made them thicker like Marisa's. So, definitely make yours at least 1/2" thickness. (Not as thin as mine below.)

cookie.cutter.jpg

If you are using the cupcake papers, just place them on a baking sheet.  If not, then line the baking sheet with parchment paper and place each cookie at least 1" apart.  Bake at 350 degrees for approximately 25 minutes.

on.the.tray.jpg
Mine, a bit flatter, wider but still tasty.

Mine, a bit flatter, wider but still tasty.

Marisa's, gorgeous, chunkier ones.

Marisa's, gorgeous, chunkier ones.

Once they cool down, place them on cute plate or stack up on cake stand.  Well, the serving device might not matter because they may not last long before you need to make another batch.  

cookies.pieplate.jpg
CU.cookie.jpg

Thanks to Marcos and Angelica for sharing the joys of their home, family, friends and traditions with us.  So I could bring this little treasure back for you from the mountain tops of Spain. The simple but delicious, simply delicious Sequillos. Que disfruten!  (Enjoy!)

mountains2.jpg

Fresh Ricotta Crostini featuring Summer Toppings

Ricotta crostini topped with the freshest, summer seasonal produce.

Ricotta crostini topped with the freshest, summer seasonal produce.

At the farmers' market this week, one of the new items to scoop up was fresh peas in their pods.  Oh, the excitement and sheer joy of bringing home new seasonal produce. Now, I know this may not be everyone's reaction, but it's fun playing with food.  As per usual though, I didn't have an inkling of what I would make but I knew I had to get me some peas.

Then off to our local organic market I wandered and found pea shoots.  Again, not sure what their destiny would be but had to get them, too. Especially since it felt in keeping with the peas.  I also found French Sourdough bread, which I grabbed in an effort to test how my wheat and yeast sensitivity would fair with this one.

Once I was home, I still didn't have a clue as to what I would do. But just when all hope seemed lost, I thought of ricotta. Whenever in doubt you can always count on cheese as your salvation. With that, I was off to the races with a plan in hand.  I decided that I would celebrate some of the jewels of the season and feature them on crostini.  

Now don't get too excited thinking I'm a genius.  This is not some super "oh my God, what a innovative idea" moment. It's a just a few good pairings that are easy to assemble and even easier to enjoy.  It's summer for Pete's sake.  We all want no brainer food ideas.  This one fits the bill.

Here are the stars of today's show.  
French Sourdough Bread, Fresh Ricotta, Fresh Peas, Pea Shoots, Nectarines, Mint, Tomatoes, Basil

Look at that bounty of summer jewels.

Look at that bounty of summer jewels.

I almost feel silly giving any kind of instructions as this couldn't be easier, and it's pretty self explanatory, but... 
First things first, toast the bread.

You can mix and match at will. One thing remains the same; dollop some the ricotta on each slice and then build each crostini using whichever of these flavor busting seasonal ingredients tickle your fancy to create your perfect crostini. 
Here's what I did.

Pea-Pea Shoot Crostini

  1. Shuck the peas and blanch them. You can also eat them raw. (Can't find fresh, use frozen ones and blanch.)

  2. Top the bread with ricotta.

  3. Add shoots & peas pressing them in.

  4. Sprinkle with coarse sea salt and drizzle with olive oil.

Fresh Tomato-Basil Crostini

  1. While still warm, rub the toasted bread with fresh garlic.

  2. Top with ricotta, fresh slices of tomatoes, basil.

  3. Sprinkle with coarse sea salt and olive oil.

It's as simple as rubbing it on

It's as simple as rubbing it on

Fresh bite of summer

Fresh bite of summer

Roasted Tomato Crostini

  1. Roast grape tomatoes with oil and whole garlic pieces.

  2. Mash the garlic with sea salt, pepper & oil.

  3. Spread the garlic mash on the toast.

  4. Add ricotta, roasted tomatoes, basil and drizzle with tomato juices.

Roasted garlic cloves, sea salt, pepper and olive oil

Roasted garlic cloves, sea salt, pepper and olive oil

Spread as much or as little, but spread this golden goodness.

Spread as much or as little, but spread this golden goodness.

I'm sure you will figure out what to do with all those candy jeweled roasted tomatoes. One idea: make more crostini!

I'm sure you will figure out what to do with all those candy jeweled roasted tomatoes. One idea: make more crostini!

Sweet and savory bite.

Sweet and savory bite.

Nectarine-Mint Crostini

  1. Make a mint simple syrup by heating up equal parts sugar and water with mint leaves until sugar dissolves.

  2. Drizzle the simple syrup on top of the bread.

  3. Top with ricotta, nectarine, minced mint and drizzle some more.

It seriously doesn't get easier than this. These make a wonderful little afternoon snack.  How about a luxurious breakfast treat.  An elegant brunch item. Naturally these are ideal as a party appetizer.
So simple. So fresh.  So seasonal.

These are but a few of the endless variations for crostini. But ones the truly celebrate the summer's seasonal offerings.  Make one. Make them all.  
A few other topping ideas:

  • Sautéed spinach with garlic, oil and red pepper flakes

  • Sautéed broccoli rabe with garlic, oil and shaved Parmesano Reggiano

  • Fresh figs drizzled with honey (you can also add chopped prosciutto)

  • Strawberries, fresh thyme sprinkled with raw sugar

Seriously, it's bread with cheese, top it with whatever floats your boat, and then happy sailing.

Tortilla - Tradtional Spanish Style

Oh so many years ago, I had the awesome experience of living in Spain.  Madrid, to be specific. And I loved every minute of it. Including the moment I arrived and ordered a Tortilla Tradicional.  

Tortilla, in Spain, is quite a different thing than that of Latin American countries.  In contrast to the flour or corn flat bread,  the Spanish tortilla is made with eggs, potatoes and onions, and is considered more of a cake or torta. Tortilla being the diminutive form, means little cake.  Hence this egg/potato combo is less omelette and more cake.  In Spain, it is simply known as Tortilla, but to distinguish it from a French omelette or from the South American flatbread, it is often called tortilla de patatas or tortilla española.

No matter what you call it, this 'cake' is a delight to eat either as a snack, which is how the Spaniards usually eat it, or for breakfast/brunch.  Heck, why not a slice for dinner with a vegetable or salad on the side.  (A true Spaniard would be appalled at that suggestion.  But I am here in the U.S., and we need our greens!)

I will admit that making this was new to me. Years ago I tried my hand at making a tortilla but it didn't quite turn out to the thick, dense omelette it should be. A few reasons for my failure as a true Spaniard.  I didn't have an equal amount of eggs to potatoes which is what creates both the thickness and density. Plus I didn't poach the potatoes first. I cooked it altogether in a frittata style.  Working at Despaña has taught me a ton, including how to make a proper Spanish Tortilla.  After asking Chef Jaume Guerra, and watching the cooks make countless tortillas, one after another, each looking exactly the same, I felt ready to attempt it again. Please, do not get me wrong, I'm still not an expert.  Mine did not look as stunningly perfect as theirs but I have more confidence that I have the right technique now.  With that, an ever-good student knows how important it is to teach after she has been schooled. So here is the proper way to make this famous, delicious, versatile Tortilla.  Best part, It requires very few ingredients.

Ingredients


6 eggs, beaten
6 potatoes, thinly sliced
1/2 yellow onion, thinly sliced
Oil, salt


Instructions

Slice the potatoes and onion thinly.  I use a mandolin.  You can use the single cutter side of a box grater, or simply cut thinly with a knife.  In a sauté pan add at least 2/3 cup of oil and slowly heat, and add the potatoes and onions. Beat the eggs and set aside.

Ready, set, poach.

Ready, set, poach.

Yes, it's a ton of oil.  but not all of it is absorbed so don't freak out.

Yes, it's a ton of oil.  but not all of it is absorbed so don't freak out.

The key in cooking the potatoes is to poach them in the oil not fry.  So low and slow is the goal.  Let them cook in a gentle manner until the potatoes break apart. Then drain them, reserving the oil.  (Since the oil was not heated to the boil point you can reserve it and use it to cook at a later time.)  

Slowly poaching away to a soft tenderness.

Slowly poaching away to a soft tenderness.

Let the potatoes cool slightly. You don't want to add them to eggs when they are too hot, but you do want them to be warm so that when you mix them with the eggs it creates almost a custard.  

Drain the potatoes, and reserve the oil.  It can be used again.

Drain the potatoes, and reserve the oil.  It can be used again.

Mix with eggs while still warm, but NOT hot.

Mix with eggs while still warm, but NOT hot.

Put some of the oil back in the pan and add your egg/potato mixture.  Cook over low heat slowly. Let the mixture set a bit and then using a spatula start to form sides and keep the omelette moving.  Allow this to cook 3/4 of the way. Then once it is set with rounded edges, slide it out of the pan onto a plate and then place the pan on top of the plate and flip it over back into the pan to let that side cook.  

You can see that it's potatoes being held together lovingly by eggs.

You can see that it's potatoes being held together lovingly by eggs.

Slide it onto a plate.

Slide it onto a plate.

Then place the pan on top and flip it over.

Then place the pan on top and flip it over.

Despaña makes a variety of tortillas.  Some have chorizo, others have cheese, or zucchini.  The traditional is made of just the ingredients listed above but you can add whatever floats your Spanish Armada.  With Mother's Day approaching, this could be a nice way to start the day and treat your 'reina' - aka Queen.

tortilla.platter2.jpg

I made this for dish when my niece, Lauren who studied in Barcelona, came for a visit. She loved living in Spain too, and has a passion for Spanish food and culture.  So I thought it only fitting to make this classic tapas treat for her.  


It was the perfect offering for a late Saturday lunch along with a charcuterie and cheese platter. Slice the tortilla up by cutting a pie wedge, serve with a glass of red wine and some crusty bread.  Can you say OLE! Sure can. And now you, too, know how to make a proper Traditional Spanish Tortilla. Viva España!

Spicy Chick Pea Crunch

I love crunch.  I'm always looking for a snack that delivers that kind of texture.  I also like to have this type of offering on a party table such as spiced nuts or these Spicy Chick Peas.  It's an easy item to to have at the ready when guests just arrive as you serve up cocktails, as well as placing around the party setting or on a cheese platter.  It's the kind of appetizer that people can pick up a handful and pop in their mouths as they go.

Abundant charcuterie platter with cheeses, dry cured meats, Marcona almonds, dried apricots and of course, Spicy Chick Peas.

Abundant charcuterie platter with cheeses, dry cured meats, Marcona almonds, dried apricots and of course, Spicy Chick Peas.

There are many versions of roasted chick peas but I like them a bit spicy.   I experimented with a blend of spices that creates enough heat to make you notice but not so fiery that you can't or won't want more.

Here's the combo I ultimately came up with and love.


INGREDIENTS

1 can of Chick Peas (29 oz), rinsed and drained
1 t course sea salt
1 t cumin
1/2 t chili powder
1 t tumeric
1/2 t cayenne pepper
2 T olive oil  

INSTRUCTIONS

Toss all above ingredients together and place on a roasting pan.  Roast at 400 degrees for 45 minutes until the chick peas have dried out.

Turn oven off and let sit for another 15 minutes, or take out and leave in the pan for 1/2 hour.  (This step is important because if you put them in a closed jar right away they will get soggy.  But they can still be saved by putting them back in a low oven temp to dry out. How do I know this?  I made the mistake and figured out a solve.)  

Crispy, fiery nuggets of crunch heaven

Crispy, fiery nuggets of crunch heaven

These are great served warm but are just as yummy cool.  These pair perfecting with red wine or a gin or vodka cocktail.  I have even taken some to the office as a snack, minus the vodka cocktail (although, there are some days when I wish I had one!).  Enjoy the Crunch... And the Heat.

Lunch 3 Ways, as performed by Roasted Vegetables

The Stars

The Stars

Yeah, yeah, I know that you know that I LOVE roasting vegetables.  Honestly, it's one of the easiest, most efficient and delicious ways to cook them.  All the work is done for you.  Place 'em on a pan with the magic 3 (oil, salt & pepper), slide into a 400 degree oven and done and done.   

Knowing this, you won't be surprised that I've come up with 3 more ways to serve up roasted vegetables. This was yet another time when we had a handful of unused items from a party that needed to be cooked up. As usual when I looked at these, I wasn't sure what their final use would be, but before they went bad they needed one last curtain call.  

The stars of this day's performance: Introducing the Carrot, The Vine Tomato, The Beet,  The Yellow Pepper and of course, Miss Fennel.

Destined for sweetness by way of roasting.

Destined for sweetness by way of roasting.

Adding the Magic 3, Olive Oil, Salt & Pepper

Adding the Magic 3, Olive Oil, Salt & Pepper

I added potatoes because JC loves these roasted

I added potatoes because JC loves these roasted


Lunch Performance #1 - The Stack 'em Up Sandwich

Place a few of the roasted tomatoes in a small food processor along with crushed garlic, pinch of salt and 2-3 T olive oil. Pulse until you get a chunky paste.


Place a few slices of your favorite cheese on one side of the bread and broil it until the cheese is melted. (I used Ojeva Negra, an earthy Spanish sheep's milk cheese.)

Add a smattering of the tomato-garlic 'jam' and begin stacking the veggies onto your sandwich. From here you can begin diving in or take it the next step and panini it.  This earthy, crunchy lunch was for JC since I don't eat bread.  Sucks for me.

The Full Stack

The Full Stack


Lunch Performance #2 - Quinoa Bowl

Cook up your favorite quinoa.  I used an organic multi grain one.  Ready up your roasted veggies and cut into bite sized pieces.

Once quinoa is cooked, arrange in a the bowl, top the quinoa with the tomato 'jam' and dig in.


Lunch Performance  #3 - Pasta Toss

I don't need to tell you that this was my favorite.  I'm such a pasta monster.  You can use whatever type of pasta floats your boat.  Semolina is still my favorite but I can't eat wheat anymore so I cooked up some brown rice elbow macaroni.  

While the pasta was cooking, I sautéed 1/4 c chopped shallots, 2 cloves chopped garlic and some left over grape tomatoes equally about 2/3 cup. (Again, any amount that you have will work, so don't worry so much about amount here.)  Once those were soft, I added all the other roasted vegetables that I chopped into bite sized pieces.

To add a bit more heartiness as well as creaminess, I added a can of baby cannellini beans with their liquid, and a touch more salt & good amount of crushed red pepper.

Then came the star of this show. Can you tell I like pasta?  In went the cooked elbow macaroni. Add whatever shape you like  and gently stir together.  

Plate it up in a nice serving bowl and grate some Locatelli cheese on top.  This was satisfyingly yummy.  Add a glass of red wine, and you'll have a Joie de Vivre lunch, for sure.

I hope you love roasting vegetables as much as I do.  They are so adaptable to so many dishes. Be forewarned, roasted and grilled vegetables will make encore presentations in the future... and often.  Why not, their versatility is not to be reckoned with.  Get your veggie on!

P.S. The roasted potatoes were not called upon for lunches, but did make their appearance as a side dish for dinner.  Plus a few were eaten right out of the oven while making the lunches.  Seriously, who could resist those crunchy bites.